是五月呀!

shiro开发(二)认证

认证,即在应用中谁能证明他就是他本人。一般提供如他们的身份ID一些标识信息来表明他就是他本人,如提供身份证,用户名/密码来证明。

在shiro中,用户需要提供 principals(身份)和 credentials(证明)给shiro,从而应用能验证用户身份:

  • principals:身份,即主体的标识属性,可以是任何东西,如用户名、邮箱等,唯一即可。一个主体可以有多个principals,但只有一个Primary principals,一般是用户名/手机号。
  • credentials:证明/凭证,即只有主体知道的安全值,如密码/数字证书等。

最常见的principals和credentials组合就是用户名/密码了。接下来先进行一个基本的身份认证。

认证流程

首先引入shiro-core包依赖:

1
2
3
4
5
<dependency>
<groupId>org.apache.shiro</groupId>
<artifactId>shiro-core</artifactId>
<version>1.2.6</version>
</dependency>

在resources类路径下创建文件shiro.ini:

1
2
3
[users]
zhang=123
wang=123

此处使用ini配置文件,通过[users]指定了两个主体:zhang/123、wang/123。

测试用例:

1
2
3
4
5
6
7
8
9
10
11
12
13
14
15
16
17
18
19
20
21
22
23
24
25
/**
* 使用IniRealm读取shiro.ini进行认证
*/
@Test
public void testIniRealm() {
// 1、获取SecurityManager工厂,此处使用Ini配置文件初始化SecurityManager
// 底层会构造一个IniRealm,从ini文件中读取用户信息,用来做登录校验
IniSecurityManagerFactory securityManagerFactory = new IniSecurityManagerFactory("classpath:shiro.ini");
// 2、得到SecurityManager实例 并绑定给SecurityUtils
SecurityManager securityManager = securityManagerFactory.getInstance();
SecurityUtils.setSecurityManager(securityManager);
// 3、得到Subject及创建用户名/密码身份验证Token(即用户身份/凭证)
Subject subject = SecurityUtils.getSubject();
UsernamePasswordToken token = new UsernamePasswordToken("zhang", "123");
try {
// 4、登录,即身份验证
subject.login(token);
} catch (AuthenticationException e) {
// 5、身份验证失败
e.printStackTrace();
}
Assert.assertTrue(subject.isAuthenticated()); //断言用户已经登录
// 6、退出
subject.logout();
}

  1. 首先通过new IniSecurityManagerFactory并指定一个ini配置文件来创建一个SecurityManager工厂;
  2. 接着获取SecurityManager并绑定到SecurityUtils,这是一个全局设置,设置一次即可;
  3. 通过SecurityUtils得到Subject,其会自动绑定到当前线程;如果在web环境在请求结束时需要解除绑定;然后获取身份验证的Token,如用户名/密码;
  4. 调用subject.login方法进行登录,其会自动委托给SecurityManager.login方法进行登录;
  5. 如果身份验证失败请捕获AuthenticationException或其子类,常见的如: DisabledAccountException(禁用的帐号)、LockedAccountException(锁定的帐号)、UnknownAccountException(错误的帐号)、ExcessiveAttemptsException(登录失败次数过多)、IncorrectCredentialsException (错误的凭证)、ExpiredCredentialsException(过期的凭证)等,具体请查看其继承关系;对于页面的错误消息展示,最好使用如“用户名/密码错误”而不是“用户名错误”/“密码错误”,防止一些恶意用户非法扫描帐号库;
  6. 最后可以调用subject.logout退出,其会自动委托给SecurityManager.logout方法退出。

认证流程:

流程如下:

  1. 首先调用Subject.login(token)进行登录,其会自动委托给SecurityManager,调用之前必须通过SecurityUtils.setSecurityManager()设置;
  2. SecurityManager负责真正的身份验证逻辑;它会委托给Authenticator进行身份验证;
  3. Authenticator才是真正的身份验证者,Shiro API中核心的身份认证入口点,此处可以自定义插入自己的实现;
  4. Authenticator可能会委托给相应的AuthenticationStrategy进行多Realm身份验证,默认ModularRealmAuthenticator会调用AuthenticationStrategy进行多Realm身份验证;
  5. Authenticator会把相应的token传入Realm,从Realm获取身份验证信息,如果没有返回/抛出异常表示身份验证失败了。此处可以配置多个Realm,将按照相应的顺序及策略进行访问。

Realm

Realm:域,Shiro从Realm获取安全数据(如用户、角色、权限)。
就是说SecurityManager要验证用户身份,那么它需要从Realm获取相应的用户进行比较以确定用户身份是否合法,也需要从Realm得到用户相应的角色/权限进行验证用户是否能进行操作。
可以把Realm看成DataSource,即安全数据源。如我们之前的ini配置方式将使用org.apache.shiro.realm.text.IniRealm

org.apache.shiro.realm.Realm接口如下:

1
2
3
4
5
6
7
8
9
10
11
12
/**
* 返回一个唯一的Realm名字
*/
String getName();
/**
* 判断此Realm是否支持此Token
*/
boolean supports(AuthenticationToken token);
/**
* 根据Token获取认证信息
*/
AuthenticationInfo getAuthenticationInfo(AuthenticationToken token) throws AuthenticationException;

来实现一个简单的Realm。

1
2
3
4
5
6
7
8
9
10
11
12
13
14
15
16
17
18
19
20
21
22
23
24
25
26
27
28
29
30
public class MyRealm1 implements Realm {
@Override
public String getName() {
return "myRealm1";
}
@Override
public boolean supports(AuthenticationToken token) {
// 仅支持UsernamePasswordToken类型的Token
return token instanceof UsernamePasswordToken;
}
@Override
public AuthenticationInfo getAuthenticationInfo(AuthenticationToken token) throws AuthenticationException {
// 得到用户名
String username = (String) token.getPrincipal();
// 得到密码
String password = new String((char[]) token.getCredentials());
if (!"zhang".equals(username)) {
// 如果用户名错误
throw new UnknownAccountException();
}
if (!"123".equals(password)) {
// 如果密码错误
throw new IncorrectCredentialsException();
}
// 如果身份认证验证成功,返回一个AuthenticationInfo实现
return new SimpleAuthenticationInfo(username, password, getName());
}
}

ini配置文件指定自定义Realm实现(shiro-realm.ini) :

1
2
3
4
#声明一个realm
myRealm1=com.maybe.shiro.case0.realm.MyRealm1
#指定securityManager的realms实现
securityManager.realms=$myRealm1

shiro可以配置多个Realm:

1
2
3
myRealm1=com.maybe.shiro.case0.realm.MyRealm1
myRealm2=com.maybe.shiro.case0.realm.MyRealm2
securityManager.realms=$myRealm1,$myRealm2

securityManager会按照realms指定的顺序进行身份认证。
此处我们使用显示指定顺序的方式指定了Realm的顺序,如果删除“securityManager.realms=$myRealm1,$myRealm2”,那么securityManager会按照realm声明的顺序进行使用(即无需设置realms属性,其会自动发现)。
当我们显示指定realm后,其他没有指定realm将被忽略,如“securityManager.realms=$myRealm1”,那么myRealm2不会被自动设置进去。

shiro默认提供的Realm:

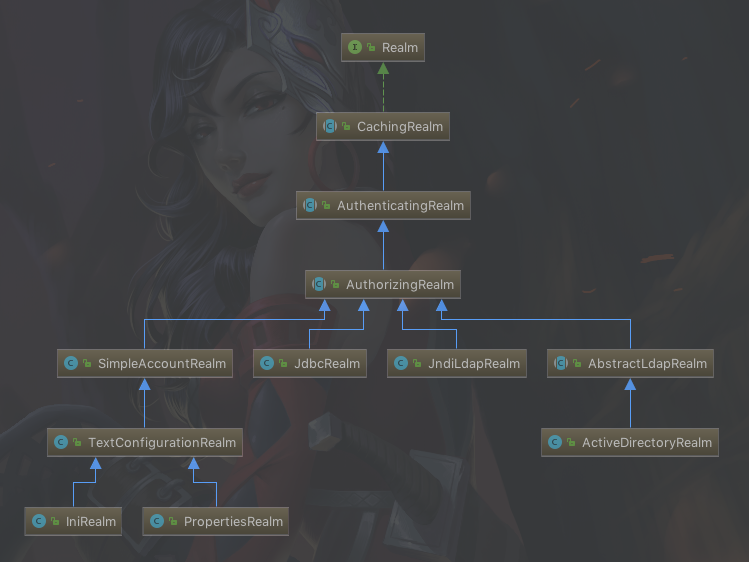
以后一般继承AuthorizingRealm(授权)即可;其继承了AuthenticatingRealm(即身份验证),而且也间接继承了CachingRealm(带有缓存实现)。其中主要默认实现如下:

  • org.apache.shiro.realm.text.IniRealm:[users]部分指定用户名/密码及其角色;[roles]部分指定角色即权限信息;
  • org.apache.shiro.realm.text.PropertiesRealm: user.username=password,role1,role2指定用户名/密码及其角色;role.role1=permission1,permission2指定角色及权限信息;
  • org.apache.shiro.realm.jdbc.JdbcRealm:通过sql查询相应的信息,默认的查询语句为“select password from users where username = ?”获取用户密码,“select password, password_salt from users where username = ?”获取用户密码及盐;“select role_name from user_roles where username = ?”获取用户角色;“select permission from roles_permissions where role_name = ?”获取角色对应的权限信息;也可以调用相应的api进行自定义sql。

试一下JdbcRealm。
首先创建三张默认表,users(用户名/密码)、user_roles(用户/角色)、roles_permissions(角色/权限),并插入一条用户数据,用户名/密码为zhang/123:

1
2
3
4
5
6
7
8
9
10
11
12
13
14
15
16
17
18
19
20
21
22
23
24
25
26
27
28
29
30
drop database if exists shiro;
create database shiro;
use shiro;
create table users (
id bigint auto_increment,
username varchar(100),
password varchar(100),
password_salt varchar(100),
constraint pk_users primary key(id)
) charset=utf8 ENGINE=InnoDB;
create unique index idx_users_username on users(username);
create table user_roles(
id bigint auto_increment,
username varchar(100),
role_name varchar(100),
constraint pk_user_roles primary key(id)
) charset=utf8 ENGINE=InnoDB;
create unique index idx_user_roles on user_roles(username, role_name);
create table roles_permissions(
id bigint auto_increment,
role_name varchar(100),
permission varchar(100),
constraint pk_roles_permissions primary key(id)
) charset=utf8 ENGINE=InnoDB;
create unique index idx_roles_permissions on roles_permissions(role_name, permission);
insert into users(username,password)values('zhang','123');

添加数据库依赖:

1
2
3
4
5
6
7
8
9
10
<dependency>
<groupId>mysql</groupId>
<artifactId>mysql-connector-java</artifactId>
<version>5.1.38</version>
</dependency>
<dependency>
<groupId>com.alibaba</groupId>
<artifactId>druid</artifactId>
<version>1.1.10</version>
</dependency>

shiro配置文件:

1
2
3
4
5
6
7
8
jdbcRealm=org.apache.shiro.realm.jdbc.JdbcRealm
dataSource=com.alibaba.druid.pool.DruidDataSource
dataSource.driverClassName=com.mysql.jdbc.Driver
dataSource.url=jdbc:mysql://localhost:3306/shiro
dataSource.username=root
dataSource.password=xxx
jdbcRealm.dataSource=$dataSource
securityManager.realms=$jdbcRealm

Authenticator及AuthenticationStrategy

Authenticator的职责是验证用户帐号,是Shiro API中身份验证核心的入口点:

1
public AuthenticationInfo authenticate(AuthenticationToken authenticationToken) throws AuthenticationException;

如果验证成功,将返回AuthenticationInfo验证信息;此信息中包含了身份及凭证;如果验证失败将抛出相应的AuthenticationException实现。

SecurityManager接口继承了Authenticator,另外还有一个ModularRealmAuthenticator实现,其委托给多个Realm进行验证,验证规则通过AuthenticationStrategy接口指定,默认提供的实现:

  • FirstSuccessfulStrategy:只要有一个Realm验证成功即可,只返回第一个Realm身份验证成功的认证信息,其他的忽略;
  • AtLeastOneSuccessfulStrategy:只要有一个Realm验证成功即可,和FirstSuccessfulStrategy不同,返回所有Realm身份验证成功的认证信息;
  • AllSuccessfulStrategy:所有Realm验证成功才算成功,且返回所有Realm身份验证成功的认证信息,如果有一个失败就失败了。

ModularRealmAuthenticator 默认 使用AtLeastOneSuccessfulStrategy策略。

试一下AllSuccessfulStrategy
假设我们有三个realm:

  • myRealm1: 用户名/密码为zhang/123时成功,且返回身份/凭据为zhang/123;
  • myRealm2: 用户名/密码为wang/123时成功,且返回身份/凭据为wang/123;
  • myRealm3: 用户名/密码为zhang/123时成功,且返回身份/凭据为zhang@163.com/123,和myRealm1不同的是返回时的身份变了。

ini配置文件(shiro-authenticator-all-success.ini) :

1
2
3
4
5
6
7
8
9
10
11
#指定securityManager的authenticator实现
authenticator=org.apache.shiro.authc.pam.ModularRealmAuthenticator
securityManager.authenticator=$authenticator
#指定securityManager.authenticator的authenticationStrategy
allSuccessfulStrategy=org.apache.shiro.authc.pam.AllSuccessfulStrategy
securityManager.authenticator.authenticationStrategy=$allSuccessfulStrategy
myRealm1=com.github.zhangkaitao.shiro.chapter2.realm.MyRealm1
myRealm2=com.github.zhangkaitao.shiro.chapter2.realm.MyRealm2
myRealm3=com.github.zhangkaitao.shiro.chapter2.realm.MyRealm3
securityManager.realms=$myRealm1,$myRealm3

再来一个不能全成功的配置文件(shiro-authenticator-all-fail.ini) :

1
2
3
4
5
6
7
8
9
10
11
12
#指定securityManager的authenticator实现
authenticator=org.apache.shiro.authc.pam.ModularRealmAuthenticator
securityManager.authenticator=$authenticator
#指定securityManager.authenticator的authenticationStrategy
allSuccessfulStrategy=org.apache.shiro.authc.pam.AllSuccessfulStrategy
securityManager.authenticator.authenticationStrategy=$allSuccessfulStrategy
myRealm1=com.maybe.shiro.case0.realm.MyRealm1
myRealm2=com.maybe.shiro.case0.realm.MyRealm2
myRealm3=com.maybe.shiro.case0.realm.MyRealm3
securityManager.realms=$myRealm1,$myRealm2

下面是测试用例:

1
2
3
4
5
6
7
8
9
10
11
12
13
14
15
16
17
18
19
20
21
22
23
24
25
26
27
28
29
30
@Test
public void testAllSuccessfulStrategyWithSuccess() {
login("classpath:shiro-authenticator-all-success.ini");
Subject subject = SecurityUtils.getSubject();
//得到一个身份集合,其包含了Realm验证成功的身份信息
PrincipalCollection principalCollection = subject.getPrincipals();
Assert.assertEquals(2, principalCollection.asList().size());
}
@Test(expected = UnknownAccountException.class)
public void testAllSuccessfulStrategyWithFail() {
login("classpath:shiro-authenticator-all-fail.ini");
Subject subject = SecurityUtils.getSubject();
}
private void login(String configFile) {
//1、获取SecurityManager工厂,此处使用Ini配置文件初始化SecurityManager
Factory<SecurityManager> factory = new IniSecurityManagerFactory(configFile);
//2、得到SecurityManager实例 并绑定给SecurityUtils
org.apache.shiro.mgt.SecurityManager securityManager = factory.getInstance();
SecurityUtils.setSecurityManager(securityManager);
//3、得到Subject及创建用户名/密码身份验证Token(即用户身份/凭证)
Subject subject = SecurityUtils.getSubject();
UsernamePasswordToken token = new UsernamePasswordToken("zhang", "123");
subject.login(token);
}

也可以自定义AuthenticationStrategy实现,

1
2
3
4
5
6
7
8
//在所有Realm验证之前调用
AuthenticationInfo beforeAllAttempts(Collection<? extends Realm> realms, AuthenticationToken token) throws AuthenticationException;
//在每个Realm之前调用
AuthenticationInfo beforeAttempt(Realm realm, AuthenticationToken token, AuthenticationInfo aggregate) throws AuthenticationException;
//在每个Realm之后调用
AuthenticationInfo afterAttempt(Realm realm, AuthenticationToken token, AuthenticationInfo singleRealmInfo, AuthenticationInfo aggregateInfo, Throwable t) throws AuthenticationException;
//在所有Realm之后调用
AuthenticationInfo afterAllAttempts(AuthenticationToken token, AuthenticationInfo aggregate) throws AuthenticationException;

因为每个AuthenticationStrategy实例都是无状态的,所有每次都通过接口将相应的认证信息传入下一次流程;通过如上接口可以进行如合并/返回第一个验证成功的认证信息。
自定义实现时一般继承org.apache.shiro.authc.pam.AbstractAuthenticationStrategy即可。
例如实现一个仅一个realm认证通过的OnlyOneAuthenticatorStrategy

1
2
3
4
5
6
7
8
9
10
11
12
13
14
15
16
17
18
19
20
21
22
23
public class OnlyOneAuthenticatorStrategy extends AbstractAuthenticationStrategy {
@Override
public AuthenticationInfo afterAttempt(Realm realm, AuthenticationToken token, AuthenticationInfo singleRealmInfo, AuthenticationInfo aggregateInfo, Throwable t) throws AuthenticationException {
AuthenticationInfo info;
if (singleRealmInfo == null) {
info = aggregateInfo;
} else {
if (aggregateInfo == null) {
info = singleRealmInfo;
} else {
info = merge(singleRealmInfo, aggregateInfo);
if(info.getPrincipals().getRealmNames().size() > 1) {
System.out.println(info.getPrincipals().getRealmNames());
throw new AuthenticationException("Authentication token of type [" + token.getClass() + "] " +
"could not be authenticated by any configured realms. Please ensure that only one realm can " +
"authenticate these tokens.");
}
}
}
return info;
}
}

参考:
第二章 身份验证——《跟我学Shiro》
Apache Shiro Reference Documentation